Friday, November 17, 2017

How I clean up after Nail Smooshes / Watermarbles / Decals (Things I Wish Someone Had Told Me Earlier)


This is a very rough, phone camera tutorial of me cleaning up the following mani:

I see a lot of questions in facebook groups asking how, and apart from the general 'acetone and a brush' response I couldn't find something that went into detail. I'm writing this from a 'what I wish someone had told me' point of view - by no means am I any sort of expert at how to do this. This is just how I do my clean up, and it took me a while to learn to get a clean, neat line.

Anyway, enough rambling. Without further word vomit, I present the inaugural 'Things I Wish Someone Had Told Me Earlier' (TIWSHTME).

♥♥♥

Wednesday, November 8, 2017

NAIL ART ROUND-UP - Halloween 2017 + UPDATE

I've been incredibly slack about posting here but I've been a busy bee throughout the month of October doing lots of Halloween nail art. This is a quick round up of my manis - you can see more pics on my instagram using the #bilbypawshalloween17 

I've also decided to try and use this blog as more of a waffling / how-to set-up that is going to move a bit away from the image-based, "look here is this thing I did" format. That's what I'm using Instagram for. I know a lot of bloggers do this to try and monetise their blogs / get stats on hits but I'm not that. I will never be a swatcher who can do a quick turn around because of my health. 

Friday, September 22, 2017

SWATCH - 'Clever Girl' from Femme Fatale (Thermal)

Today I'm sharing some shots of 'Clever Girl' from Femme Fatale's 'Welcome to Mars' collection. Femme Fatale is one of my favourite indie nail brands and I own some amazing thermals from them. Clever Girl is shifts from a bright candy red when cold to a clear jelly base when warm, leaving full view of the multitude of golden glitter on display.

I believe the red jelly base leans pink, but the gold glitters in the mix can make it look orange-leaning. It's one of those little details that elevates a good polish into a complex beauty. It is indeed the transitioning state of 'Clever Girl' that really caught my eye - it becomes this lovely sheer pink-red gradient polish with that gold glitter peeking through. It makes me think of a juicy ripe peach, for whatever reason. Do you see that, or is it just me? I've saved my final image for last so do endeavour to make it to the end of the post!

Here I have applied 3 thin coats with a Seche Vite top coat. 

'Clever Girl' by Femme Fatale Cosmetics. Image @bilbypaws
Full mani in cold state (red)
'Clever Girl' by Femme Fatale Cosmetics. Image @bilbypaws
Full mani in transitioning state (cold to warm)

Sunday, September 17, 2017

NAIL ART - Fantasy Forest Collaboration / Ladies of Color Group

I've been feeling quite fatigued this last couple of weeks so I haven't done much in way of photos or posting, but here's some nail art I did a while back for the Ladies of Color group on instagram organised by Diana of @nailcraftaddict.

Here is the group's mani collage below. You can see the close up of each 'square' here and find all the manis and their owners at #locfantasyforestcollab on instagram. The manis are inspersed with great inspiration images and I really enjoyed seeing so many creative offshoots of the same theme. 

Wednesday, September 6, 2017

NAIL ART / REVIEW - Sinful Colors Hypnotic Transforming Top Coat

Not too long ago, I stumbled upon the #fluidnailart on Instagram and found myself mesmerised by the hypnotising patterns created seemingly by magic. I believe they were mostly created by utilising silicon spray with nail polish - I am unsure of the exact logistics but were so stunning! I couldn't see myself adding to the nail polish fumes so I filed the idea away in the 'live vicariously' brain folder...

Then this range of polishes came out. The Sinful Colors Punk Yourself collection is a mix of 5 'regular' shades and 5 shades of transforming top coats. The following description is from the SC site:
Get Punked Up! A unique, edgy & liquefied look in a single brush stroke! Punk style is all about celebrating self-expression with a customized, one-of-a-kind look. Applied over wet polish, Hypnotic Transforming Top Coat instantly creates a melted, dissolved or dyed effect. The results are totally unique with each use! 
I bought the entire transforming range. The colours are (below image, clockwise from top left): Redrum (bright primary red), Punk the Town (fuschia-leaning purple), Rebel Rebel (navy / tardis blue), Purpunk (dusty pastel violet), and Concrete Jungle (slate grey).

Sinful Colors Hypnotic Transforming Top Coat - Bottle Flat Lay by @bilbypaws
Image taken under indirect sunlight
I could only find these polishes internationally on eBay from ebay seller 'onelasttouch'. You can view the listing here. I paid a total of $31.04 AUD for 6 polishes (I bought a double up of Purpunk) and $20.30 AUD for postage. The seller messaged me after to let me know she kindly covered postal insurance for me out of her own pocket so the shipping cost might be different. It worked out to an average of ~$8.60 AUD each, which is fairly reasonable for the number of polishes and the HTF factor. For the record, Sinful Colors polishes stocked in store here for between $4.95 - $6.95 AUD depending on the line. I highly doubt the line is going to make it over here from the US as it is only being sold in Walgreens there, but if is I will definitely be purchasing back ups!

Sinful Colors Hypnotic Transforming Top Coat - Bottle Flat Lay 2 by @bilbypaws
Image taken under indirect sunlight
The transforming top coats had a formula similar to regular cremes. They are recommended for use 'over wet polish'. I decided to use a variety of techniques I had seen done from Kyong (@kyong.lee.92), Eugenia (@laqvid) and Linda (@_nail_ninja) and layered some regular polishes with 1-2 shades of the transforming top coat on my silicone mat. These ones were done mostly by swirling the polish with squishy rubber stamp, but I did fold the mat on some designs to spread them out. The decals were a lot thinner than most I usually make, and I found this helped it to adhere to the nail much better.

After I carefully peeled the decals off and cut them up, I stuck them to my nail with my Emily de Molly's basecoat. It becomes tacky approximately 20-30 seconds after applying, which is the perfect time to apply the decal. I then sealed the edges with acetone and topped it with Seche Vite. 

Sinful Colors Hypnotic Transforming Top Coat - Nail Art of 4 fingers of the right hand against a yellow background by @bilbypaws
Right (non-swatching) hand, hence the nub

Sinful Colors Hypnotic Transforming Top Coat - Nail Art of 4 fingers of the left hand against a yellow background by @bilbypaws
Left (normal swatching) hand
Sinful Colors Hypnotic Transforming Top Coat - Nail Art of all fingers of the left hand against a yellow background by @bilbypaws
The full left hand with thumb
I love the mix of colours. To me it looks like a cool tie-dye. In future I will definitely try to stick to one colour palette when selecting decal portions so they look less random. You can see in my left hand that I tried to pack all the cool parts in, but then I realised how it looked a bit disjointed and my right hand matched a lot better. I am also going to try to stick to 3-4 colours per fluid nail design. I just get so dang excited I tend to try to include ALL OF THE COLOURS (ditto watermarble) but.I think the effect is most striking when not having to compete with the colour distraction.

Sinful Colors Hypnotic Transforming Top Coat - Macro of nail art by @bilbypaws
Close up of left pointer finger
Sinful Colors Hypnotic Transforming Top Coat - Macro of nail art by @bilbypaws
Close up of left thumb
Close up of right middle and ring finger
You can use the #sinfulcolorspunkyourself#scpunk#hypnotictransformingtopcoat, to have a look at how other people have used them. I will be playing with these more (I already have since taking these photos). Let me know if you try them!

Wednesday, August 23, 2017

SWATCH - Femme Fatale Cosmetics 'Fields of Treasure' and 'Heavenly Rainment'

Today I have swatches of two older polishes from Femme Fatale Cosmetics, Fields of Treasure and Heavenly Raiment (more images after the jump)! I'm hoping doing quick posts like this prompt me to update more frequently.

FEATURE: Krystal aka QueenofNails83 and her Women of Color makers / bloggers project


Today I am cross-posting / linking to a project run by the amazing Krystal Moore at QueenOfNails83. Krystal is a blogger and swatcher and one of the first WOC I found when I started getting into indie polish. Like with any area of interest for me, I take a special interest in supporting other POC and their endeavours when possible.

All images in this post will be taken from Krystal's blog and will link to the relevant post if you click on them!

Easter Watermarble / Nail art by Krystal (QueenofNails83)
Easter Watermarble / Nail art by Krystal

Monday, August 14, 2017

NAIL ART - Spooky Sailor

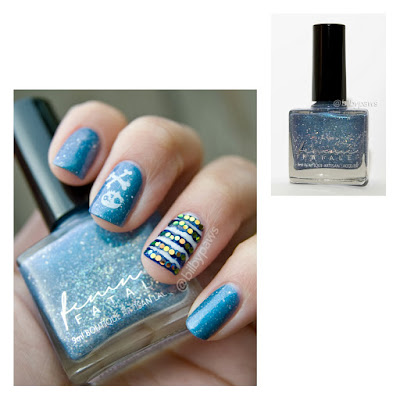
Just a quick post of some nail art I forgot I did. The polish I was wearing made me think of ocean waves under moonlight. When thinking of glinting bits (okay that sounds a bit suspicious) and rolling waves, my brain conjures up haunted ships and unyieling fog. I decided to go with a spooky nautical / ghost pirate theme. Yes, really. More photos and details post-jump.

Thursday, August 10, 2017

SWATCH - SM Polish (Part 2 of 2)

Today I bring to you the second half of my SM Polish Haul. If you missed Part 1 (where I spoke about the polish formulas in general), you can find it here. Shopping links will be at the bottom, like before. I've also started adding watermarks to my images so I can have them nice and large without fear of them being stolen. I think it's fairly subtle, anyway.

I will be showing you Envious, Violetta (with nail art), The Emperor's New Clothes, and I Blue Up the Dance Floor in this half. I didn't get to doing photos of Pink Fizz as I'm midst Fibro flare-up, and I wanted to have this up as I've taken long enough. I might add it retrospectively. Anyway, let's get on with it!

Tuesday, August 1, 2017

SWATCH - SM Polish (Part 1 of 2)

Today I have my very first order from SM Polish to share with you! I ordered 7 polishes (pictured below) and was sent 2 mini bottles with it. I am going to split this swatch / review into 2 posts because of how many pictures I have. 

(Pictured, from L-R) 
Top Row: Envious, Desire, Mum's the Word, First Glow, Sly as a Fox
Bottom Row: Violetta, The Emperor's New Clothes, (Sample) Pink Fizz, (Sample) I Blue Up the Dance Floor

Here is Part 1, Part 2 shall be uploaded shortly. This part shall cover Desire (+ stamping with the 'I Blue Up the Dance Floor' sample), Sly as a Fox, and Mum's the Word.


Tuesday, July 25, 2017

NAIL ART - Using polishes from AngelKiss Nail Lacquer (Nom Nom Collection)


Hi everyone!

This is an add on to my previous swatch post of polishes from AngelKiss Nail Lacquer (Nom Nom Collection). If you haven't seen that please go have a look to see my swatch pictures and thoughts on this collection.

I am adding some nail art done over and with some of the polishes I swatched. Pictures after the jump!

SWATCH - AngelKiss Nail Lacquer (Nom Nom Collection)

Hello!

I am newly trying to navigate this whole blog thing so please bear with me. Mistakes might be made.

In my inaugural post to this site, I am going to show you some swatches and notes from AngelKiss Nail Lacquer. AngelKiss Nail Lacquer is run by Alba, and I believe was formerly a running indie polish company. At the moment Alba mostly swatches and reviews, and occasionally releases a preorder collection like this one.

This collection is titled the 'Nom Nom' collection and is composed of a collection of six polishes inspired by and named after desserts: Choc Mint, Strawberry Creme Brulee, Mocha Frosting, Coffee Fudge, Cotton Candy, and Sugar Sprinkles. (Note: I know it's Crème Brûlée to the pedantic, but I'm going with how the polish creator wrote it in my review.)

I preordered four of the polishes which can be seen in the bottle shot below:


(From L-R) Choc Mint, Strawberry Creme Brulee, Mocha Frosting, and Sugar Sprinkles.

The colours in this photo are as accurate as I could get them to real-life shades. They were shot in a softbox with a speedlight. Individual swatches and some nail art after the jump!